


The first part of this section was originally intended for the Autumn Bulletin but our Editor ran out of space so we have included it at the start of this one. The advice here is intended for plants and containers to grace your garden not to produce plants for exhibition. If followed it should result in plants that flower both early and more or less continually.
New plants for the new year.
At the rear of our publications you will find several of the specialist nurseries advertisements and as these nurseries are helping to support the society with their adverts we feel we should point them out to you. Most you can call on when the new season starts and most also do a mail order service so you can have that particular cultivar which the general garden centres have never heard of. This is an excellent time to send for their 2003 catalogues. Do not forget to add some stamps with your request so they can post it back to you. If you have the time when you have decided what you want and you possibly can, do call on the nursery, as then you can pick the strongest cuttings and seek any advice that the nursery can give you from their wealth of specialist knowledge. Have a cardboard box that you can close, to put your cuttings in, it gets very cold in the boot of a car at this time of the year. Any sudden change of temperature to your cuttings, which have up to now been in ideal temperatures and conditions, can give them a shock and stop them growing for a while, till they have recovered.
Prior to going to collect your new plants it would be wise to have available all the little things and materials to look after them for when you get them home. You will need some plant pots in a range of sizes, as some fuchsias resent being put in too large a pot straight from the cutting stage. Some plant saucers are also a good investment as if all your plants stand in saucers it is easier to get their watering right. The trick being to only water through the saucer and after 15 minutes or so to tip away any water that remains in the saucer. What this does, is to prevent the top of your compost getting too wet and encouraging fungus spores to germinate. Fresh potting compost will also be required. Much is written about this subject but fuchsias are very accommodating and will grow well in most composts, so stick with one you are happy with. If you have no experience to draw upon, then try a universal peat or peat substitute one. As at this time of year it will be cold outside, it is helpful if this compost can be at the same temperature as you maintain in your growing area. Your growing area then seems to be the best place to keep your open bag of compost in rather than outside or in some other building. Your cuttings will all be of fairly soft growth so wherever you grow them it must be completely frost free. Round about a minimum of 40 F (50C) would be ideal. Do not be tempted to apply more heat as with the low light levels that we have at this time of the year you will only produce leggy weak growth in your fuchsias. The other thing you will need is some plant labels and of course a pen to write with. We use the label to record some of the plant history on, such as when potted, repotted etc. 4 inch labels fit the bill nicely but it does not really matter, the important thing is to add the new label as soon as possible because some labels that the nurseries use do seem to fade rather quickly. Not essential but useful will be some bamboo canes and plant ties, a sharp knife or small scissors, cloths to clean pots with, bins to house any plant debris, large bucket or water container (this too should be housed in your growing area so it is the same temperature as your compost) and a fuchsia diary so you can record when you did what. This will be useful to you next year when you can use it to regulate when you do specific things next year.
Choosing your new plants.
This is almost the best bit, as if you have a good imagination you can just picture in your mind what they are all going to look like. Given a little attention it is surprising just how near you will get to those ideal plants.
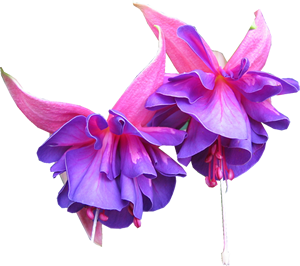
As you walk into any good fuchsia nursery early in the Spring you will see row upon row of what appears to be perfect little cuttings and you will be tempted to have one or two of each of them. Please resist this temptation as fuchsias have a habit of growing very quickly and no matter how few you start with, they will be sure to fill the space you have available long before it is safe to move them out. It is only fair to say we were all told this and most of us ignored the advice, but experience has since shown us the error of our ways. Have a list of what you are looking for, even if this only consists of general comments like “enough for six baskets and twelve bushes”. For a basket five plants are enough, it is not compulsory but it is better if these are all the same cultivar so that they all grow at similar rates and are likely to flower at the same time. For bushes buy two of each cultivar and then if one does not grow at the same rate as the other you will know one of them needs attention. A good cutting is not necessarily the biggest one, you should look for one that is strong and has a gloss on the leaves, with the pairs of leaves closely spaced and with each pair of leaves being the same size. These leaves should extend down the cutting almost to the compost level. If they do not ask yourself why, then ignore it. The more leaf area the faster the plant will grow for you. If you intend to grow a standard then make sure the cutting still has a growing tip at the top of the main stem. If you are uncertain as to the suitability of a cultivar for your purpose, ask the grower as they will have been around for some time and will have in all probability grown it on to a large plant at some time. Try to have a mixture of cultivars which include both single and doubles in your collection. If you go with a friend choose different cultivars to them. You can then exchange cultivars cuttings with them later on. Place the cuttings in your cardboard box and if you can put some rolled up newspaper round the pots to stop them moving in the box so much the better. Close the lid before you leave the greenhouse and get it into the car boot as quickly as possible. Take them home and lift them carefully out, space them out and look them all over. Remove any leaves that have been damaged or fallen off. Give them several days to acclimatise to their new conditions before you do any more to them. Note in your diary what and when you bought. It will soon be time to grow them on. Initially all your plants whatever purpose you intend them for, will be grown on in pots and their treatment will be very similar.
Pot Plants
For your plants to grow they need some warmth, lots of light, adequate amount of space for their roots to grow in, and most importantly, your loving care and attention. The more T.L.C. the better. As your plants will regularly be potted on into fresh compost long before any nutrients are exhausted, you will not have to feed your plants, at this stage. with any liquid fertiliser.
After a few days it will be time to “pot on” your newly acquired cuttings. This means moving them into a larger pot with some fresh compost. The standard advice is to move them on one pot size at a time and until you know your cultivars better, this is the best policy. The compost should be at the same temperature as your growing area and needs to be just moist. Take a handful of compost and squeeze it. if water comes through your fingers its too wet, let it go and if the compost all falls apart it is too dry. if it holds together then you have it just about right. Take an empty pot one size larger than the one your cutting is in and put a little compost in the bottom, knock your cutting out of its existing pot and place the now empty cutting pot on top of the compost. Fill the new pot with compost so you form a mould round your empty cutting pot. Remove carefully the cutting pot and if all has gone well there should be a hole exactly the same size as the compost round your cutting. Place your cutting in this hole and give the pot a couple of taps on the bench. Resist any temptation to water the plant for at least a couple of days. Repeat this for all the cuttings you wish to “pot on”. This potting technique is a useful one and should be your preferred way to pot on most plants. It gives the least disturbance to your cutting and ensures that you have not handled the main stem. Handling the main stem is one of the quickest way of killing the cutting we know of.
When you observe roots beginning to be seen at the drainage holes of the pot, then it is time to repeat the process into yet another larger pot. As most of your plants will have been grown from cuttings, it is unlikely you will have to go much beyond a 5 inch pot. It is probably advisable to stop at this size any way as you will then see the flowers earlier.
Your freshly “potted on” cutting will soon begin to grow. This growth will, if left to its own devices, be mainly from the top of main stem and be upward. This is not what we need and the plant has to begin its training if it is going to be that beautiful plant you saw in your minds eye when you purchased it. Now be brave and carefully remove the growing tip leaving at least three pairs of leaves on the main stem, unless you intend it to be a standard. This is called “stopping the plant”. A funny description really as you are doing the opposite, you are making it grow. The tip can be used to produce a cutting if you wish. When you remove the tip do not touch the stem with your fingers, if you need to hold the plant, then hold a leaf. Always use a sharp knife or pair of scissors and clean it before you go on to do another plant. Having removed the tip this will cause side branches to grow. These too will need “stopping” when large enough, leaving two pairs of leaves on each branch after the tips are removed. As it is important to do this to all the branches in the same session, you may have to let some of the branches grow on till they can all be stopped at the same time. This will not hurt as when you have finished all the branches will be stopped with two pairs of leaves. Once again make a note of the date in your diary each time you stop them. If you have decided on a particular time when you want to have your plants in flower it is important to do your last stop at the right time. As a general guide this is 7 weeks for singles, and 10 weeks for doubles. Different cultivars do tend to vary however and if you have recorded everything in you diary, next year you will know those cultivars which do not follow the general trend.
These pot plants can be used to fill other containers, or from those you have not stopped, standards can be produced. Others can he used as bedding plants in your garden, either as half hardies or if is the right sort of cultivar, a full hardy which can stop in the garden all year round.
Hanging Baskets
These are very rewarding to grow as the flowers can be seen as soon as you look at the basket and it will continue to flower all season. The plants for these baskets however, should initially be grown as pot plants till they fill a 5 inch pot (12.5cm.). Then and only then should they be transferred to your basket.
&Once again we follow the system which we used to pot on the plants, by moulding your compost round five empty 5 inch pots. one of these is in the centre of the basket and four are evenly spaced round the basket. Remove the four outer pots and fill the holes with plants taken out of their pots. You should now have four plants in your basket with the centre empty, except for the empty pot. Leave this pot in and do all your watering through this pot till the four plants are well established. Some people actually drill holes in the side of this pot so the water can get into the compost easier. Try half one way and half the other and see which suits you. Having this gap in the centre of the basket will enable you to remove any fallen leaves without disturbing the freshly planted fuchsias. Some four to six weeks later you can add the last plant into the centre. Having done that then the basket can be given its last stop making sure all the growing tips are removed on the same day. If you have any wayward branches cut these back hard so as to give your basket an even shape. Now just water and feed it. To avoid building up any toxic levels of salts from your liquid fertiliser a useful practice is to carefully read the instructions on its container and use four times the amount of water they suggest and use this quarter strength solution every time you water. Once a month add a dessert spoonful of Epsom Salts to a large watering can full of your normal feed and give your plants a little treat.
To encourage the growth coming over the sides of your basket to hang down and cover the basket quicker add a clothes peg to the leading shoots to weigh them down. Make sure however that the shoot is in the hole that would normally go over the clothes line and is not being pinched by the peg. Whenever the opportunity presents itself put the basket outside, but if it is forecast that it is going to be windy or frosty take it back inside.
Standards
These are great fun to grow, but remember that they will be large plants by the end of the season and if you wish to keep them over the winter they will take up a large amount of room, so do not grow too many, or be prepared to dump some of them at the end of the year.
If you followed the advice above, you will have some of your plants growing in pots that have not been stopped. These will make your standards. Having decided which are going to be your standards, put a thin stake up the side of the main stem. This stake should be about 18 inches long. Make sure that this stake is vertical and is not going to twist your plant out of shape. Then tie the main stem of the plant to this stake very loosely. If your finger will not go between the stake and the main stem easily when you do this, then it's too tight. You can use plant ties for this, but we have found that knitting wool does the job better. We are aiming for as much growth as possible in the shortest possible time, for by the end of June you will want them in your garden. To get this sort of growth we need the plant to have as much leaf area as possible, as it is in the leaves that the building blocks for growth are produced. To achieve this we will leave on the main stem all the leaves growing there plus four sets of side shoots. Soon however, a fifth pair of side shoots will start to grow at the top of the plant just below the leading tip. When these side shoots have produced one pair of leaves it is time to gently remove the very bottom pair of branches so as to reduce the number back to four pairs. Continue to do this till you have a length of clear stein of about 18 inches. At this stage the leading growing tip of the standard can be removed about ¼ inch above the highest pair of side branches. If at any time the plant gets higher than its supporting cane it will be necessary to replace the cane with a larger one. If you used wool to tie the plant to the cane this can easily be cut with a pair of scissors. Again do not tie too tight, use the finger test to get it correct. To further encourage growth pot them on as soon as you can see any sign of roots near the drainage holes in the pot. Shortly after you have removed the leading growing tip from your standard it will be necessary to start to train the head. The top pair of branches should be shortened right back to the first pair of leaves growing on the branch. The next lower pair of branches should be treated much the same, but this time leave two pairs of leaves. The remaining branches should also be cut back, but to three pairs of leaves. Masses of side shoots will result from this drastic stop and these should in turn be stopped at each pair of leaves. The only exception to this will be any side shoots that appear on the main clear stem, these should be removed as soon as possible. By mid June it will be time to think about getting them ready to plant out in garden, and they need to be acclimatised to the outside conditions before you can do this. So, as often as possible, stand them outside during the day and bring them back in at night, unless the night is particularly mild. Unfortunately, it only takes a slight breeze to make a standard in a pot fall over, so you will need to take some action to prevent this. We use a horizontal rail that is about 18 inches from the floor and attach the main cane of the standard to this. We use wool so we can cut it easily. Come the end of June you can then plant them out in their summer position. When we do this we always tie a label with the cultivars name to the main stem so we know which one it is when we are asked.
Hardies and Half-hardies
These too need to be acclimatised to outdoor conditions before being planted directly into the garden so follow a similar procedure to that suggested for the standards. When planting place them in a saucer shaped depression about 2 to 3 inches deep and scatter a general fertiliser round them. "Growmore" is quite acceptable.
Thats all for now folks, more in Annual. Do let us know how you get on and any problems you may encounter.
